| Saturday, June 26th 2004 |
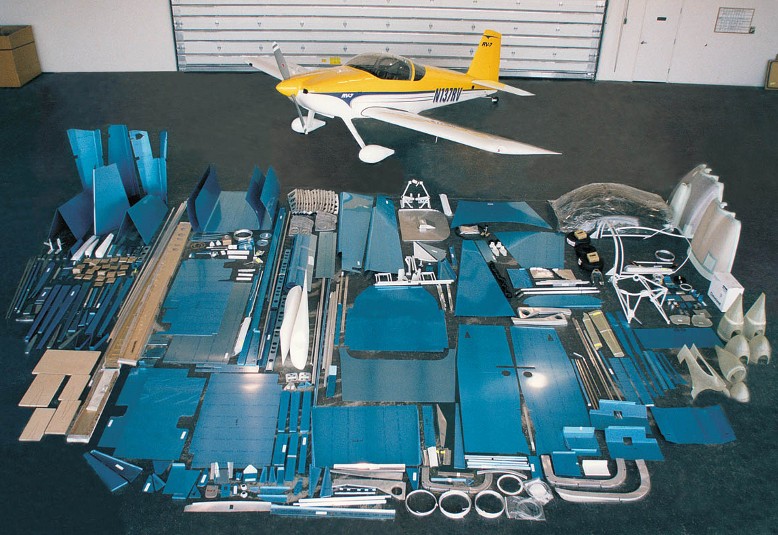
Inventory of the received Empennage kit |
|
In the received packages, I found a picklist from Van's. Van's asks to control the delivered parts immediately to make a control on possible damage due to the transport. They also advise to control the presence of all parts by using their picklist. I really do have a very good feeling until now on the way Van's is handling their orders on a very professional way. Not even one screw missed. All the parts were crated on a very careful and perfect way. Fantastic !! |
|
The empennage kit is already provided with an update of the construction description pages (which I already ordered with the preview set) and a final set of building drawings... |
|
After controlling the several parts and after making a complete inventory of the delivered stuff I organised all the parts by sorting them per category. I did put everything on different shelfs in a separate place close to the workshop. This took some time but I'm sure that this way of organising will be very helpful in the future... |
| Time spend for this: |
04:30 h |
| Saturday, July 5th and 12th 2004 |
Organising hardware parts |
|
Several paperbags with all kind of rivets, bolts, nuts are part of the delivered empennage kit. I'm not so familiar with the sizes used in the building description but, with the help of the perfectly documented stocklist, I started to organise all this stuff in a way that I can almost blind to the parts needed in the building process. An impression in the pictures.
An advise: a Dymo is more than helpful for labelling all parts... |
|
|
|
|
The same box is a good storage for the cleco-family ... |
|
Van's delivers a handy bolt gage together with the empennage kit. I mounted it to the wall very close where I build my RV. A nice and helpful tool to identify the right codes used for the different bolts... |
|
I started the construction of the jig within my cradle. As I noticed on David's website and on the website of Dan Checkoway, this is very helpfull for lining the construction of the empennage. |
| Time spend for this: |
04:05 h |
| Tuesday, July 13th 2004 |
I called Mr. Philippe Brotcorne, the inspector of the Aviation Authorities to make an appointment to perform the inspection of the workshop. He gave me authorization to start building my empennage. I'm so impressed by this person. Very friendly, cooperative and... speaking very well the Flemish language as a native French speaking man. It is a very good feeling to be in contact with an enthousiastic person like him... |
|
|
|
HORIZONTAL STABILISER START |
|
|
| Saturday, July 24th 2004 |
The real work started, the rear spar assembly |
|
As described in Van's building instruction section of the empennage, I started to "break" the edges of the HS-609PP. The way these parts fit inside the HS-603)) impressed me. Absolutely perfect... I removed all the milling and file marks and started drilling all the prepunched holes to the correct #30. |
| After all the preparation described I started assembling the rear spar. I clecoed the HS-412 and... |
|
| the HS-413. |
|
| The two HS-411 (A+B)PP parts together with the VA-146 bearing are clecoed to the spar to have a good base to drill all the necessary holes with a #30 drill. |
|
| Afterwards I removed this assembly to drill the two remaining holes. |
|
| Time spend for this: |
06:30 h |
| Saturday, August 21th 2004
until Friday, 27th 2004
|
I took one week off after 3 weeks of inactivity due to a small surgery in the hospital and my Hoganas experience in Sweden. I planned to finish the Horizontal Stabiliser this week. |
|
I started all preparation following the manual for this week. I prepared all the parts as described in the different sections of Van's manual. Drilling, preparing the edges by breaking them, deburring, dimpling, countersinking etc... Some pictures show these techniques. For deburring the small holes in most of the different parts I used the most simple but safest method..., using a drill between the fingers and twisting it around for two or three turns... |
|
Breaking the edges of the parts ... |
|
|
|
|
|
Dimpling by useing the squeezer and the dimple dies. What a nice instrument and... what a beautiful technique... |
|
|
|
On Wednesday, after fine tuning my jig, I clecoed the complete Horizontal Stabilizer for the first time to a recognizable aircraft part... Thrilling ....
Now I'm becoming more and more enthousiastic. After my week in Hoganas where I had my first RV-sensation, I would like to be some 1500 hours further... I flew my first Barrel Roll in a RV6. And, believe it or not, I filmed it from out the cockpit... (see this film). Jezus, what a sensation. I'm sure to go back to this wonderful Fly-In in Sweden next year. Friendly people, and, the RV-community here in Europe is extraordinary nice. I'm glad to be part of it and so is Elvira, my wife...
(See the pictures of Hoganas) |
|
I started to deassemble the clecoed Horizontal Stabilizer, marked all the parts and started to prepare them for priming. Using a Scotchbrite all the parts were roughend, cleaned with aceton and then cleaned with the special Spiess Hecker product using plastic gloves. What a job... but, necessary to guarantee a maximum quality for the priming session. Some pictures... |
|
All parts of the Horizontal Stabiliser ready to prepare for priming ... |
|
I ordered a high quality Spray Can together with the Spiess Hecker primer. Not cheap but you feel the quality of this little thing. The sales representative who advised me this thing called it the "Rolls Royce" of the spray cans. And, I do have to agree, it IS fantastic... |
|
And last but not least, the first primed parts. Again a real sensation to see these ready-to-assemble parts... |
|
All sides primed, controlled and ready to assemble... |
|
What an adventure... It took me some exercise and reviewing the video I bought before I started riveting the parts. As a "non-technical" educated guy, I spend a lot of time in "reading" the plans. The sort of rivets, their codes, the views... but... I succeeded. After one day, together with a little help from my friend Ronny, we assembled the Horizontal Stabiliser. And, you can imagine how proudly I'm looking back to this week. My first Aircraft part is ready to be inspected by the Authorities. The rear spar isn't riveted so the inspector can have a look inside. After the inspection I will close it pemanently. Oh yes, forgot something. In assembling the rear spar I noticed that some bolts, nuts and washers where missing. Strange because I checked everything. But, in the kit there was a bag which had a description "different hardware for the HR". Maybe a mistake was made at Van's in picking these small parts. One mail to Van's and within one night I received an answer... No problem, they are allready shipped. Thank you Van's for this fantastic service... Looking forward to bolt the center bearing to the spar... |
|
And there it is... The horizontal stabiliser ready for inspection... |
|
Waiting for the inspection I go on building my vertical stabiliser. |
| Time spend during this week |
37:00 hours |
|
|
|
VERTICAL STABILISER START |
|
|
| Monday, September 13th 2004 |
|
|
Last Saturday I had to go to the office. An early meeting at 7:00 in the morning was them start of a long day working... So, no RV-time this Saturday but, I decided to take off on Monday to be in schedule with my planning...
After studying the manual during the nighthours of last week, it seemed me quite easy to produce this part. I calculated this would be possible to do in one day. So, I started quite eqrly in the morning by clecoeing the different parts together.
|
|
Clecoed the spar doubler and the hinge brackets into the HS-803PP rear spar. I drilled afterwards the two missing holes in the VS-410 hinge brackets using the holes in the rear spar as reference. |
|
|
|
And again, after disassembling these parts, all parts had to be prepared again with drilling, dimpling, deburring, countersinking etc... Especially the spar doubler and the rear spar need some concentration because some holes need a special treatment. Their lower portion need to be riveted with flush heads on the forward side of the rear spar. So, countersinking the spardoubler and dimpling the rear spar is bnecessary... |
|
And then clecoing again to measure the skin onto the skelet of the vertical stabiliser. Ready to cleco the skin... |
|
|
|
Surprising how perfect everything fits... Once the skin is clecoed on the skelet, all the holes can be drilled. Again, a wonderful feeling to see this second Aircraft part in all its glory... |
|
The skin is drilled and now the total assembly is ready to be disassembled. Again all cleaning, deburring etc... can start. It's noon, so, I think I can manage my planning fot today. These parts have to be primed today. Next week I'm organising the Flying club's rally on Saturday so ... |
|
Fascinating picture... All the skinholes drilled, deburred and dimpled... |
|
At 04:00 PM I took this picture. All parts were primed... |
| Time spend this Monday until now |
07:00 hours |
| Saturday, October 1st 2004 |
|
|
What a helping hand means... Ronny came to my workshop and helped me riveting the vertical stabiliser. I think we spent about 2.5 hours together in finishing this job. What a great feeling, no, let's call it a kick to see this beauty standing up. My second part is done... |
|
|
|
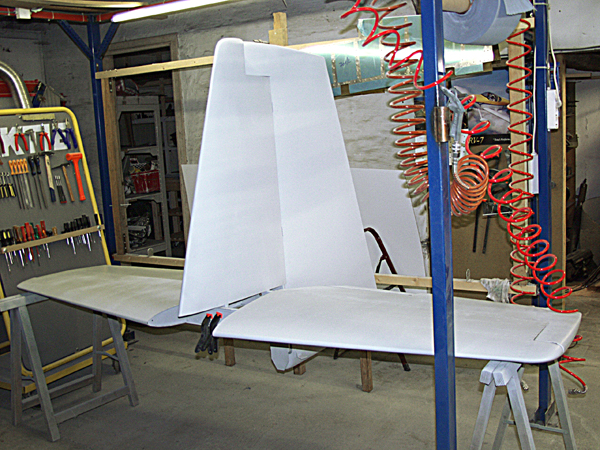
And of course I couldn't resist to put these two first finished parts together. Closing my eyes and dreaming the rest of what is coming in front of it. Well, to be hounest, until now this goes perfect. I think in a couple of weeks I will order the wing and, probably also the fuselage... |
|
You can notice that the back spar is still clecoed and not riveted yet. This is again for the inspection... |
| Time spend this Saturday for finishing the Vertical Stabisilser |
03:00 hours |
| Thursday, December 16th 2004 |
Start Finishing Vert Stab |
|
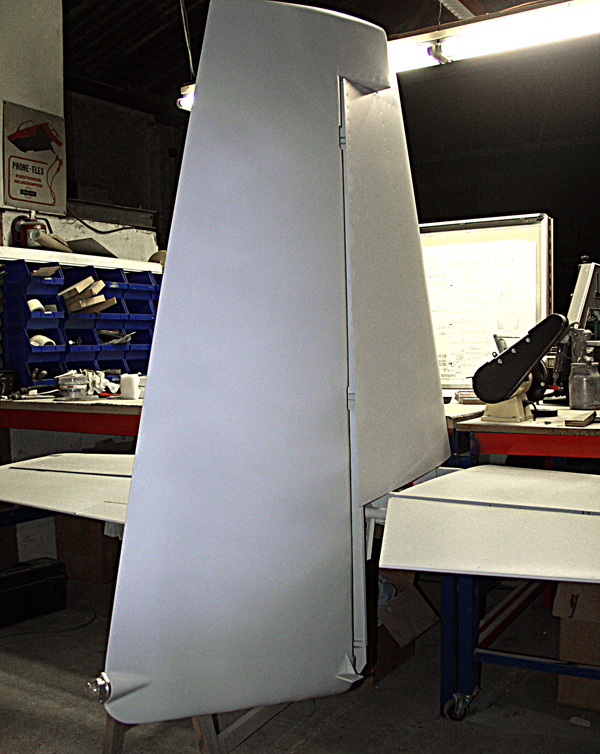
I started to finally close the vertical stabilizer after the inspection. Again I treated all the rivets with the primer and then closed the part... |
|
|
|
After it was completely closed I trimmed the epoxy part so far as possible. I still have to close the rear part after measuring and fitting the rudder. This has to wait for some days... |
|
You can see the rear spar completely riveted and the epoxy tip fitted ... |
| Time spend this Thursday |
02:00 hours |
|
RUDDER START |
|
|
| Monday, September 13th 2004 |
Some time left to start building the Rudder |
|
All the parts of the vertical stabiliser need drytime. So, why would'nt I start prepare the stiffeners for the Rudder? I'm going faster than predicted... |
|
Years ago I bought myself a bench snipper. Perdfect tool to trim the stiffeners... |
|
And before 07:00 PM the right side of the rudderstiffeners are ready. Time to stop for today. I had still some time left for today to update this part of my website. So, next week the Sanicole yearly Rally and the next week... RV-time !! |
| Saturday, October 1st 2004 |
Most of the day spent for assembling and clecoeing the rudder... |
|
After some weeks of inactivity due to the organisation of the clubrally, a very nice flight to North Holland (Friesland last week), I'm back again. I decided not to go flyiong tomorrow. It is important for me to spend tomorrow on my project instead of flying out. I had my long flight to Friesland in the beginning of this week so tomorrow will be a project day... |
|
After finishing the stiffeners on the 13th of september, I could start with dimpling the skins and prepare everything to finish them. The whole saturday I used for finishing these two skins. I even reached the anticorrosion phase... |
|
With the helping hand of Ronny we finished the backriveting of the stiffeners on the skins... |
|
But, SHTTTTT, we were over enthousiastic and ruined the left skin because the back rivet plate was not on its right place. I will have to reorder my first parts. A left Rudder skin with the stiffeners... Probably I will order it when the wings come over... |
| Time spend this Saturday for finishing the rudder skins (primed) |
10:00 hours |
| Sunday, October 2nd 2004 |
Most of the day spent for assembling and clecoeing the rudder... |
|
I started to clecoe all the different parts on the spar. First of all I assembled the R904 with the R 405PD rudder horn. I fabricated the R917 shim as described on Drawing 7. |
|
Then I clecoed the reinforcement plates R 607 and... |
|
R 608. |
|
The complete tip rib and counterbalance rib assembly fitted on the spar and with the Counterbalance skin. |
|
And everything clecoed on the main spar. |
|
Quite a precision job, fabricating and trimming the R 710 rudder brace and the two rudder bottom attachement strips (R 918). But everything went perfect... |
|
I countersinked the very fragile R 916 rudder trailing edge... |
|
All rudder parts are drilled, deburred, dimpled and ready to prepare for the next phase. Cleaning and priming. That's my next step on next saturday... |
| Time spend this Sunday |
08:30 hours |
| Saturday, September 18th 2004 |
Started Riveting the rudder together |
|
Spend the whole day riveting rudder. No pictures because the camera was used for another event... |
| Time spend this Saturday |
06:30 hours |
| Friday, November 19th 2004 |
Started Riveting the rudder together |
|
After I received the new skin I finished the rudder by riveting the skeleton and the skin together. Again, one side is completely riveted while the other remains clecoed until the inspection will take place... I spend another 4 hours to finish this phase on Friday the 19th of november. |
| Time spend this Friday |
03:30 hours |
| Thursay, December 16th 2004 |
Started final preparation of the rudder |
|
I've had my approval of the Authorities at this moment and I can continue the finalisation of the rudder. The first (and so far the only) thing I could do today, is gluing the very fragile rear spar onto one side of the rudder. I used the Fixal (see description hereunder) to keep this rear spar in place and to assure a straight edge of the rudder. After the drying process, I will start riveting this together and close the rudder. I glued this part clamped to a straight wooden ruler. This is, as I red on one of the RV-builder sites, a very approved and good method... Looking forward to see this rudder finished... |
| Time spend this Thursday |
00:30 hours |
| Thursday, December 30th 2004 |
Closing the rudder section |
|
In between and after the sanding and finishing jobs I did on the horizontal stabilizer part, I closed the rudder by riveting the remaining left skin after the inspection. |
|
|
|
Sorry for the blurred picture of the leading edge but it was meant to show you how straight the leading edge was riveted together. After drying a couple of days, the leading edge, glued with Fixal seemed to be ready for the final assembling. I followed the instruction of Vans in counting and riveting the rivets in the proper way to avoid a curved leading edge. And yes Sir, this worked perfectly as described. The result... a perfect straight leading edge with perfect rivets on both sides... |
|
Last thing I did today, the trimming of the epoxy rudder tip...
Next thing to do: finishing the vertical stabilizer section until final priming...
|
| Time spend |
03:17 hours |
| Sunday, January 3rd 200d |
Finishing the rudder |
|
The planning for today is to finish the trimming of the epoxy parts of the rudder and to form the leading edge of the rudder. So I started to trim the bottom epoxy part in which the taillight is positioned... For the first time I used my new Dremel rotary saw. Really good stuff to do such jobs... I first trimmed the rough parts of the epoxy |
|
|
|
And afterwards I did the fine tuning with a 3M high speed sanding disk... |
|
until the parts fits perfectly in place. I drilled the first hole and clecoed the part to the rudder. |
|
|
|
|
|
Another job to do was the forming of the leading edge of the rudder. Again, as I did with the elevators, I used a 1/2" steel tube that was taped with a strong 3M tape to the edge of the leading edge. |
|
|
|
and as Vans predicted in its technical notes, this technique went perfectly... |
|
After widening the holes with a drill, the standard procedure of deburring etc... I clecoed the two formed edges together. |
|
And the the last thing for today, sanding, sanding and again sanding until I received a smooth connection between the skin and the epoxy parts. |
|
So, I hope to finish this tomorrow. And with a little luck, I can prime these two last parts (rudder and vertical stabilizer) tomorrow because I have another free day. Coming weeks will be very busy but I managed to stay into my planning until now. In two weeks the new parts will arrive I hope. And then... another milestone is June to finish my wing section... |
| Time spend |
08:07 hours |
| Monday, January 4th 2005 |
Finishing the rudder |
|
Planning for today: finish all trimming and prime until finished. And so I started to mount temporarily the rudder to the vertical stabilizer. |
|
Then I trimmed the epoxy tip to the stabilizer and clecoed it. |
|
Another look to this part before starting with the MetalPlastic activity. So long for the last time in this dusty activity... |
|
The tip riveted in place and then filled with the MetalPlastic... |
|
|
|
A lot of hours sanding and then with the Zinc Chromate the first external priming... |
|
This time I had to paint it myself but I had a good teacher last week. So, everything went well... |
|
And the same for the rudder... |
|
Finally, the thicker Primer painted by myself... And again, what a good teacher can learn to you. |
|
Some more impressions. I noticed some parts where extra sanding will be necessary, but that's for later. The most important for now is that all assembled parts ae treated against humidity. So far finished... |
|
|
|
|
|
FINISHED !!! Just in time, because I expect my wing within the coming weeks. Promised by Van's is that they will be shipped next week.... Looking forward... |
| Time spend |
10:30 hours |
|
|
|
LEFT AND RIGHT ELEVATOR START |
|
|
| Saturday, September 18th 2004 |
Started preparing the elevator stiffeners |
|
I trimmed the stiffeners of the right and the left elevator. It was a little bit confusing for me how they must be cut out of the deliverd parts. After some study I started trimming them. Fantastic how economically everything is measured at Van's. Almost nothing of the delivered parts produce waste... |
|
After I had trimmed these, I started to clecoe the right elevator together. |
| Time spend |
03:30 hours |
| Saturday, September 25th 2004 |
Clecoe and matchtest |
|
Clecoed the right elevator together to see how everyting matches. And, what would you expect? Perrrfect!! |
|
I went shopping for some wood parts to make the necessary bending brake for the trimtab trailingedge. The planning is to assemble this next week |
| Time spend |
06:00 hours |
| Saturday, October 2nd 2004 |
Bending Brake assembly and start preparing parts |
|
I started today with the assembly of the bending brake using the descriptions in the Van's handouts. Having a quick surf over different RV-websites is very helpful too...
I countersinked the two bolts for the handles in a way that they will never affect the skin when it will be bended...
|
|
Here it is... May I proudly present my bending brake! |
|
I disassembled the two clecoed elevators and started to prepare them. (drilled, countersinking and the edges...) |
|
And of course, this must be tested immediately. I bended the two skins leading edges as described in the manual. |
| Time spend |
08:20 hours |
| Saturday, October 9th 2004 |
Continuing preparing the parts |
|
This whole day was necessary for finishing all the prearation of the two elevators' parts. Drilling, deburring, countersinking, fluting and smoothing the edges... |
|
|
| Time spend |
07:20 hours |
| Saturday, October 16th 2004 |
Starting assembling left elevator |
|
Checking again and finetuning where necessary... |
|
The most critical parts in the left elevator phase is the bending of the elevator ears and the trim tab. Again I ruined a skin... After a misbending of the ears, I noticed some micro cracks and I decided immediately to order my second skin. It will be delivered together with the above ordered rudder skin. Nevertheless, this was a good school experience of how things can go wrong when you are too enthusiastic... But, no problem, I have the time and I have the impression I'm going faster then planned in the beginning. So Paul, don't worry..., be happy!
I started to work further on this problem skin with the pianohinges which bring the trimtab and the elevator together. Just to gain some experience...
|
|
I positioned the piano hinge on the tab with some clecoe clamps... |
|
And drilled them in the trim tab... |
|
The opposite site of the hinges where alligned and drilled in the elevator side |
| Time spend |
06:10 hours |
| Friday, November 19th 2004 |
Riveting the left elevator |
|
To make all the necessary bendings on the trim tab and on the elevator skin, I used this technique. Two wooden shapes were fabricated, as you see on the picture. I call it an inside and an outside part which fit exactly in the elevator parts. The inside part is glued in place with a tape to avoid slipping away. Afterwards the complete assembly is clamped to a third block and kept in place with some clamps. And then the bending can start. First a little by hand but afterwards with the flush set in the rivet gun. Do not use full power in hammering the Flush set. Softly and smoothly by going up and down, left and right. This works very well... |
|
A closer view... |
|
Because the skeleton was already finished in an earlier phase, and the skin is a new ordered part, I checked the fitting of all parts first. And, as expected, everything fits perfectly. So I finished all the preparation as required on the new delivered skin and primed the skin. |
|
All the stiffeners were backriveted in place. Notice the underlaying back rivet plate. Large enough and incorporated in my new rolling workbench table. What a luxury thing... I should have made it earlier.. |
|
Everything ready to assemble... |
|
The reinforcement plate where the trim tab servo will be nested afterwards is backriveted in place... |
|
In order to eliminate the need for blind rivets (when the skeleton will be in place there is no way to rivet in an normal way), E-713 and E-701 are riveted together. The two rivets are the top two rivets I marked with the white circle on the picture. |
|
And then the E-714 (counterweight) can loosely be placed nested inside
E-713 with the screws partially inserted. |
|
After these steps are finished, the skeleton is inserted in place and all the rivets can be set. Almost everything can be done by using the squeezer |
|
Final fitting of the trimtab... |
|
until it fits perfectly... |
|
As far as possible finished, the left elevator is also waiting for the inspection. The 10th of december is the inspection date for the complete empennage. Looking forward to it so that I can start the next phase of my project.
The final finishing of the empennage and the start of the wing section... |
| Time spend |
06:30 hours |
| Friday, December 17th 2004 |
Starting finishing left elevator |
|
After the experience I had yesterday with Gerry, I started closing up the elevator and finished the leading edge all by myself. This went perfectly... |
|
And then, riveting the trimtab in place... |
|
Bringing the blind rivets on the bended skin... |
|
and trimming the tab exactly in place... |
|
... until it fits exactly in the elevator. |
|
The epoxy tip was positioned in place and riveted with the described blind rivets. I started to form the metal plastic stuff to finish this assembly. It looks blurry but... |
|
this finishing touch will be visible in all its quality after the first primer layer I will bring on this elevator. Wait and see... |
| Time spend |
03:45 hours |
| Saturday, October 23th 2004 |
Starting assembling right elevator |
|
I continued with assembling the right elevator to check the match of the parts. Afterwards I disassembled and started preparing the parts for anticorrosion. First lightly scuffing the surfaces with a red Scotchbrite, cleaning them with Aceton, again cleaning them with Silikon Entferner from Spies Hecker to remove grease from fingers and the they are ready for priming. This takes a lot of time but it is absolutely worth taking this time... |
|
Today it was cold in my workshop. So I decided to buy myself a heating gun. Absolutely nice investment for the coming cold period... |
| Time spend |
07:30 hours |
| Friday, October 29th 2004 |
Starting riveting right elevator |
|
You can imagine that I was very careful in the backriveting of the stiffeners to te skin after my previous adventure.It starts by putting all the rivets in the countersunk holes... |
|
Using the rivet tape is absolutely a nice technique... |
|
And doing this very calm and full of patience, you will succeed...
I did the backriveting only for the left elevator. The left one wil be done after I receive the new parts... |
|
The first step in the riveting of the elevator is the riveting together of E703 and E704... |
|
To be followed by the reinforcement plates |
|
Once done, the two platenuts are riveted to the spar |
|
|
|
After these steps, the spar can be riveted to the E703/704 connection |
|
Then the counterweightskin has to be riveted to the skin with two rivets on top and on the bottom to avoid later blind rivets after assembly. |
|
|
|
Now the complete skeleton can be inserted into the skin and final riveting can be performed... |
|
Until finished on one side. The opposite side remains clecoed until the inspection... |
| Time spend |
09:30 hours |
| Thursday, December 16th 2004 |
Closing the right elevator |
|
A part of the construction I was quite pessimistic for was the round leading edge to be formed with a tube of 1/2". With a little help of one of my clubmembers, Gerry Willems, this went perfectly. I'm enjoying the result. It starts looking as a completed part... |
| Time spend |
02:00 hours |
| Saturday, October 29th 2004 |
And now waiting... |
|
Well, so far so good. I'm ready so far. Now waiting for the two to-be-replaced-skins and ... waiting for my wings which I ordered. In the meantime I will do some workshop improvements... The first thing I planned and did today, is producing a safe place to put my finished parts away... Have a look... |
|
|
|
|
| Time spend |
04:00 hours |
| Good News !!! |
I ordered my wings and in the meantime the new skins. They will arrive tomorrow (Tuesday 11th). In less than one week FedEx brought it over. I'm looking forward to see the parts I orderd like the landing lights, the nav-lights, The Pitot etc... |
|
I had a chat with a local shop concerning composite materials, adhesives, working with composit materials etc... He advised me to try out the Fixall glue (seems to be spectacular in gluing different surfaces together...) for gluing the aluminum to the fiber tips.
|
|
And he gave me this metal plastic for finishing purposes after assembling the fiber stuff to the empennage parts... |
| Monday, November 29th 2004 |
Elevator and rudder tips preparation |
|
Waiting for my first inspection and... for the wingkit, I decided to start some preparation work for the fiber tips to be installed on the separate empennage items. So, as the technical description points, the easiest parts to assemble are the elevator tips and the rudder tip. So this was the first thing to do. After trimming the parts in a way that they fit best in place, I trimmed the reinforcement strips that have to be mounted inside these fiber parts. |
|
I trimmed all the fiberparts for the two elevators and the rudder. Then drilled and clecoed them in place... |
|
and the rudder tip... |
|
After these preparation tasks I made reinforcement strips for the inside reinforcement of all the fiber parts. |
|
All the drilled holes in the glasfiber parts were countersinked and the reinforcement strips were glued in place ... |
|
Notice the way I bended the reinforcement strip into the rudder tip...
For the attachement into the fiber tips I used the above mentioned FixAll glue from Soudal. This seems to be the best solution to bond aluminum and glasfiber together. Well, after the work dried completely I will keep you informed about this. Very curious for the results....
|
| Time spend |
06:00 hours |
| Friday, December 10th 2004 |
Epoxy Rudder parts |
|
I started with the construction of a reinforcement plate for the tail light. After drawing the shape of the taillight on some spare Alu, I used the snip to cut this out... |
|
I measured exactly the holes to be drilled... |
|
... and prepared the piece as usual (deburr, edges etc...) |
|
Using the new Circle cutter I drilled the hole exactly in the middle of the plate. For safety reasons I screwed it on some scratch wood. Afterwards, again breaking and filing the edges, etc... |
|
I positioned it exactly in place and strated to drill the light hole in the epoxy part. I couldn't finish this because I expected the Belgian Aviation Authorities for my first Approval Inspection... |
|
These two pictures show the final assembly of this part to the rudder. Finished and primed... |
|
|
|
|
|
This image is satisfying... Perfectly fitting taillight/strobe. |
| Time spend |
02:00 hours |
| Friday, December 17th 2004 |
Epoxy Rudder parts continued |
|
I glued the reinforcement plate into the fiber part. Unbelieveable how difficult it is to work into this part. But, nevertheless, after a lot of trimming work I succeeded to clecoe and glue it inside. I used some platenuts at the backside of the reinforcement plate to be able to screw the taillight onto the fiber part without the necessity of using nuts at the inside. It will be impossible in a later phase to hold these screws at the inside... |
|
I prepared the other tips with reinforcement plates, the same way I did with the elevator epoxy tips. |
| Time spend |
02:00 hours |
| Friday, December 10th 2004 |
Today I welcomed Mr. Philippe Brotcorne for his approval Belgian Aviation Authorities inspection of the complete empennage. And guess, ... I received the full approval to continue my project. Now I can go on with the finishing of the empennage section. The final rivets can be set, everyting can be closed and, with some good advises of Mr. Brotcorne to go on, I've got more confidence concerning the way I'm working. To be honest I was quite nervous for the inspection... Why? I don't know because I really worked as good as possible. But, as Mr Brotcorne said when he entered: " I'm Mr Brotcorne and my job is to work with the homebuilders and not again them", I felt very comfortable with his fair and professional way of working. It's a professional pleasure to have this person in your shop...
After his departure I continued of course with the closing of my horizontal Stablizer. |
|
After Mr. Brotcorne left, I couldn't resist in finalise the horizontal Stab. Here you see the first (almost) finished and closed part... |
| Monday, December 27th 2004 |
Final Assembly horizontal stab and elevators |
|
First thing I had to do was the positioning and alignment of the rod end bearings into the leading edge of the horizontal stab. As described in the details of DWG 5 (detail D) I mounted these on a distance to the leading edge of 13/16... |
|
I assembled the complete horizontal set and secured it to my wing craddle... |
|
With a laser tool, I finetuned the position of the elevators to the leading edge... |
|
Instead of fabricating a drill bushing to prevent the hinge bearing when drilling the hole into the elevator horn H 605, I used another technique. I mounted the elevators on the horizontal stab exactly in position, secured the counterbalance arm and searched for a drill with an exact diameter to the inside of the hinge bearing... |
|
On the reverse side of the drill I colored with a wet marking pencil before I put the drill back through the hinge bearing to the horn. |
|
This gave me an exact mark on the position the hole had to be drilled. By usung this technique I prevented to drill throug the hinge bearing. |
|
Have a look at the very precise mark on the
WD-605...
I repeated this technique for the other elevator as well... Afterwards I drilled both holes exactly as described and yesssss, it fits perfectly... |
|
Previously I prepared the horizontal stab tips by mounting a balsa strip inside. I covered and secured the strips with epoxy (both sides) and finished them later with metalplastic. |
|
The results were gorgious. Once mounted everything again aligned perfectly... |
| Time spend |
06:30 hours |
| Thursday, December 30th 2004 |
Final Assembly horizontal stab and elevators |
|
|
|
A full day I spend in sanding, trimming, again sanding, priming etc until everything on the horizontal stabilizer fits well.
The rest of this day I used to close
the rudder section.
(see rudder higher in this page...) |
|
The first moment I put the metalplastic it looks scaring. But, hours of sanding and forming gave a wonderful result... |
| Time spend |
04:20 hours |
| Friday, December 31st 2004 |
Final priming horizontal stab and elevators |
|
This day started for me as somewhat as the crown on the last 4 months. The so far finishing touch... This last 2004 day I planned to use to prime the full horizontal tab with zinc chromate primer and then with the final top primer. An impression of a full day working... |
|
For the first time I had a nice view on the filler and sanding job I did. Pretty good as a first impression... |
|
And then, after the first coverage with the yellow-gold primer, the first top ceverage with the thicker exterior primer from Spiess-Hecker. Guys, what a fantastic quality this stuff is... |
|
|
|
|
|
|
|
Can you imagine how proudly and satisfied I went home at 6:30 pm to have a hot bath. I prepared myself to celebrate a wonderful new year evening... And I really celebrated this milestone evening... |
| Time spend |
05:10 hours |
| Saturday, January 8th 2005 |
Last finishing touch and additional priming |
|
Well, after the priming of last week, I discovered some cosmetic problems in the parts where I used the Metal Plastic filler. So, this Saturday is dedicated to fine-tune these places. I know that the absolute finishing will finally be done at the end of the project. Just before the final exterior painting. But, nevertheless, since I have some time left now, I use this for the rough finishing of the filler mistakes. And of course to bring all the parts together so I can admire a real airplane section... But for know this is the last thing done in the tailsection...
|
| Time spend |
08:00 hours |
| Time spend for total empennage: |
213:35 hours from scratch to primed... |